

Friday, January 4, 2013
RI F25 fleet growing

Thursday, August 23, 2012
Yanmar 1GM control panel update
Below is a series of pictures showing my Yanmar 1GM control panel replacement. When I got my Freedom 25 the control panel corners were all broken, and many parts did not work. I was able to purchase a new plastic panel, and source new upgraded switches and wiring.
 Finished product: all the warning lights and buzzers work. Toggle is upgraded military grade with rubber boot
 Back side of sold control panel: notice the corners all broken, and the wiring layout is a mess, including the wires going to light bulbs are pulling the bulbs out of the sockets, and the toggle is rusted and faulty
 Back side of the Tach: no major issues just some paint touch up cleaning of pins in connector
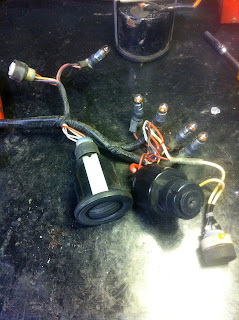 Entire control harness and bits: Buzzer, Start button, Key swich, all warning lights, plugs and switches.
 Back side of old empty panel:


Front side of old empty panel
 Toggle back side


Front side of old empty panel

Monday, August 20, 2012
Deck Repair: forward port stansion
Below is series of pictures showing a recent deck repair on Gonzo my Freedom 25, the damage happened by the previous owner when he lifted the boat with out loosening the life lines. the straps bent the forward Port stansion crushing the deck, over a few years water rotted the core and damaged the inner skin. I had help from a good friend on this project and I learned a lot about how to do this, *Note: the forward stansion also carries the added weight of the kite pole so I would encourage all F25 owners to check this stansion base often.


Tuesday, July 3, 2012
Test sail of Square top main sail F25 in RI

Monday, February 6, 2012
water line bottom growth
These are a few pics of Gonzo when pulled at the end of the season after being in Mill Cove for the entire summer. I did 1 cleaning myself with a scrub pad, you can also see the water line on the boat is high.
 one of the issues I had worked on was to move weight forward in the boat and to attempt to not have the boat sit stern down. I also did a bottom size strip and new coat, which did not include a seal coat.
 as you can see in this pic from algae growth the water line was correct in the back but not in the front. You can also see the growth was minimal and no barnacles which is nice to see. a simple squirt with the hose and it all came right off.
Wednesday, January 11, 2012
Rigging:

When I got my Freedom 25 it had cable lazy jacks, and cable back stays. But their was also a lot of missing hardware and damaged parts. From asking around and surfing the internet their seamed to be a number of different ideas and info on how peoples boats were set up. below are a few pics and info I learned from the past season on the water.
RIGGING Attachments to top of mast:

Here is a pic of the top of my winged mast, this stainless cap is a standard Freedom part. The stainless cap has a location for sheeve for main halyard with cotter pin, and a tab on frt for a shackle and block for Kite/Staysail halyard.
*note: this pic shows it fully assembled. The small blk nub is for wind instrument attachment.

In this picture you can see the frt tap with shackle and block for Kite/Staysail halyard.
*note: I used a wide enough shackle to locate the back stays on the shackle pin. With the rotating mast it's important to locate back stays on frt of mast so the tension will not keep the mast from rotating.

This pic shows the Main Halyard and sheeve, this pic shows how I attached the lazy jack cables to the sheeve cotter pin using washers and a longer pin.
BACK STAYS:

The standard back stay design for the Freedom 25 with rotating winged mast was a cable which attached to the top of mast and then turned to rope at the bottom which would be fed through a block attached to the stantion then around a winch. When I got my boat both rope section were cut and missing. This pic shows the new rope attached to the cable, redone to factory spec which is way over built.
*note: I plan to update this system in near future removing all the cables and running high grade low stretch line.
Monday, January 9, 2012
F25 mast upper bearing damage:

during the season the mast never rotated properly, and got some times would be very hard to rotate. I did a full upper and lower bearing service last winter, but this is what I found when I pulled the rig this fall
 as you can see the sleeve which stays in the boat and hold the upper bearing and keeps water out of the cabin got wedged on the mast and needed to be cut out of boat in order to pull the mast.
 *note: look to see how the mast is wedged to the left side of the tube, the upper bearing shifted causing it to get wedged
 this is the upper mast bearing, as you can see it got pulled out of it's slot in the tube and from the pic below it forced the stainless bearing on the mast to be moved as well.

 this is the upper mast bearing, as you can see it got pulled out of it's slot in the tube and from the pic below it forced the stainless bearing on the mast to be moved as well.
 *note: my guess is that during the mast install the alignment got off and the to parts of the upper bearing where not true and over time they worked each other in to a pickle... luckly their is not real damage and can be easily fixed this winter.
you can see how the stainless ring on the mast which is the inner part of the bearing assembly was forced up and off its perch, which was part of the problem.
winter blues
missing my Freedom 25, with the tarp on the boat i can do nothing but dream about sailing this summer and all the trips I want to do. I plan to put Gonzo my boat into the shed in april or may to prep for the spring launch and hope to complete a few new projects I'm been working on this past year. I also was wondering if any local freedom owners in New England would like to have a winter gtging.
cheers,
yarrow
Monday, November 28, 2011

Gonzo if out of the water and prepped for winter, I also took this opportunity to remove the rear railing which made it easier to cover with tarp. here is what I did:
1. remove boat, power wash bottom and put on trailer
2. empty all holding tanks, and bilge
3. remove bilge pump and hose
4. flush 1GM and fill with antifreeze
5. remove all cushions, and gear from boat
6. made wood batton cover for cockpit
7. put 1 tarps over boat as protection and prevent rubbing
8. put 1 heavy tarp on boat and lash to hull
Wednesday, October 12, 2011
FAll Pull Out:
well the time is coming as to when to pull out Gonzo my Freedom 25, with putting in late in the season I want to keep her in the water as long as possible, but I also don't want to wait to long and get caught in a snow storm or worse and not be able to get her stored properly. I will keep you all posted on when I end up doing the pull and up date what I find during the process and include a full list of what I do in order to prepare for the long winter.
Thursday, September 15, 2011
Hurricane Irene:
Well owning a boat and taking care of it is one thing but doing also trying to survive a Hurricane is an entirely new experience all together. The largest concern I had was how the boat would do having a winged mast which make power in 5 knots of wind and having no idea what it would be like in 50-70 knots was a bit over whelming. In the end I did as much as I could as for mooring prep, and boat prep and hopped for the best. Having a mooring in Wickford had a large part of the fact that it is one of the best protected harbors in RI and showed this during this storm. below is a list of what I did and how it turned out:
mooring prep:
. inspected chain and cleaned as much of it as I could
. replaced and upgraded the shackles and tackle hardware which attached chain to mooring ball and penants
. added a swivel to chain below all tackle which I could attach a safety line which went to mast
. added a 2nd penant, and added chafing gear
boat prep:
. took sail off boom and put in rear berth
. took boom off mast
. filled fuel tank
. filled water tank
. put mast in straight postions forward and aft
. attached jack line wires to forward pulpit rails
. tightened back stays
. attached main halyard to traveler for main sheet, centered and tightened
. removed as much windage as possible from decks
. tightened all hatches
. tied tiller to center
Result:
during storm est wind 30-50 mph the boat was tacking hard on the mooring sailing until penant pulled bow through a tack. interesting to watch concidering all other sailboats where staying straight into the wind. the boat came out with no issues or damage and very happy with resutl
Saturday, August 13, 2011
2nd Sea Trial:
So after about 2 weeks of pulling the boat together, and getting her ready for round 2, with this being said what I'm finding with boating is that you just can't always be prepared even when you think everything is taken care of. I found this out the hard way during this Sea Trial.
2nd Sea Trial:
1. got motor running really well, and boy what a difference
2. sorted out sail issues, including setting up 1st reef as a Cunningham
3. wind was from NW 5-10knots, boat did really well sailed down to Jamestown bridge and back.
4. Everything great until we looked in the cabin to find about 50-100 gallons of water in the boat. in the end found the bilge drain tube was pumping water in the boat, I also found out that the OEM hand pump bilge hose was dry rotted and had holes so did not work properly.
5. with all of this going on and a bit of crazy time, the boat did great and got us home.
6. today will fix the problem with a 1.5" check valve and new Y connector, I will also service the OEM bilge pipe so it has sections which can be serviced.
Review: in the end I am really happy with the boat we were doing 5+ knots on reach with just the main. I have a lot of learning to do as this boat sails like a windsurfer, and the winged mast really does make a difference. can't wait to play with the Kite and staysail.
Friday, August 12, 2011
1st Sea trial: ups and downs
SEA Trials, the ups and downs:
Well for owning this boat and doing a good amount of work on the boat including changing many of the system, I am in the process of doing sea trials to make sure all the systems on the boat are working properly this is my record of accounts:
1st sea trial: (the day after the boat was launched)
1. got half way out of harbor, and found that the fuel lines were crossed and buried under the driveshaft causing it to hold the shaft from spinning not allowing the prop to open, it also was wearing through the fuel line causing air to enter the system.
2. battons for main had tension issues, and main had some fitment issues to the mast and spar:
a. the slide on the clew of the main would not enter the boom slot
(solution was to remove the end cap and pull sail out and put slide in far end)
b. tack needed to be attached some how
(used a strap of 12 strand with a ball loop)
c. their is a pin at the bottom of the mast track to to keep sail from falling out of track.
Monday, August 1, 2011
Gonzo my F25 Sailboat Floats: 1st pics from the dock
Here are the 1st pics I took from the dock, I have named my boat "Gonzo" I will give a few report in the near future. Since this date I have moved to my mooring and working towards my 1st sea trial.


The Launch: Pleasant Street Wharf RI 7-29-11 4pm


Well the long awaited time came, I did not get as much done as I hoped before this date but I had to get this boat in the water as the summer was going by quick: here are some pics I took, I have to say for all the planning and prep I sure did make a mess of the whole process and really need to thank the guys at Pleasant Street Wharf for staying late and allowing me to get her in the water and to the dock.


yes I know I missed a spot for bottom paint. mental note when you don't sleep for a few days and go to launch your 1st boat you tend to miss some things ;)

Freedom 25: forward berth cabin sole repair
When I purchased my boat it had some water damage from a leaking forward hatch. this was the result the pic is after I tore up the old rotted floor. Below are a few pics of my repair, sorry for the yellow pics the light was not great as I did all the work at night with a shop light.

This is what I started with after removing the damaged cabin floor, after looking around I found the section of floor is supported in sections inside hatches. I decided if I'm going to do the work I should do it properly.

you can see that I removed the old rotted floor, to get this far I had to remove starboard and Port rear berth tops and all hardware.

this is what is left, the white wood floor is the angled section. After removing all the old wood and berth sections you can see it is a lot easier to work and repair this floor section as all the supports are easy to get to and flat.
 I made a template out of cardboard and used it to cut my new floor. I wish I had the $$ to use the teak and holly to match the rest of the cabin.
A quick test fit and it's ready to go back together. after putting it all back together
Note: I would suggest to lay up all the berth section including top parts before attaching the curved part to make sure it all fits.
 detail shot
 detail shot: note forward berth support installed.
  All done, you can see in this pic that I also replace the Port upper berth top. all that is left is a few finish coats and should be like new.
Freedom 25: winged mast upper bearing service

Here are a few pics of my recent service of the upper teflon bearing on my rotating wing mast for my Freedom 25. as you can see from the wear inside the tube that the previous owner never serviced this bearing, and had been using the boat with out an material.

This shows the inside of the F25 mast tube, the slightly darker section is an indent which is 2 inches wide and is designed to take a Teflon or similar plastic. when combined with the stainless ring on the mast work as a bearing.

here you can see the plastic insert I purchased. After doing some research I found that their is a number of plastics which will work just as well as Teflon but at less then half the price.
*note: I test fit strip and messured 3 inches of overlap and marked with a green marker. pic below
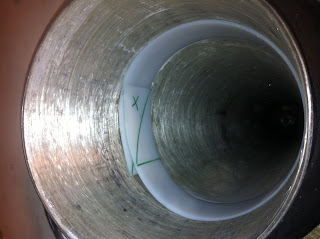
pic of the test fit, you can see the over lap of the strip. the diagonal line is were I am going to cut, the x is the side I will cut off so the 2 ends will fit nicely together.
 here you can see the trimmed ends of the strip. I used a jig saw which cut very cleanly with no burs.
Finished: unfortunately because of material nothing will stick to it so you need to use the tension of the material to hold it in place.
Thursday, July 28, 2011
Freedom 25: Lower Mast bearing removal

Well after a few months of putting this off, I final took the plunge and did a full Freedom 25 Rotating Wing low Bearing service. I learned a lot and hope these pics and info help anybody who is looking to do this work to their Freedom 25.

This pic is before I started, you can see the bottom of the mast is in fair condition some cracking of paint and laminate. The cable running down the mast is for the mast head light.
What you are looking at is 3 parts:
1. outer ring: Lower Grease seal
2. fat ring inside: old bearing is rusty and seized in the mast
3. smallest inner ring: upper Grease seal
Note: from looking at this for many months, it looks like the lower grease seal is a metal section laminated in the mast base (this is not so) and their are 3 screws threaded into mast which do nothing.

This is a side shot of lower mast, note the 3 small threaded holes are for 3 stainless screws. which I removed to find did nothing and attached to nothing in the mast.

This is a pic of the Lower Grease seal which was pressed in to the lower section of the mast.
Tool to pull:
1. puller, pic below
2. ice pick with tip bent 90 degress
Note: you can see all the old grease and dirt build up as this process moves along.
 Pic of the puller, I used the pick to clean out old grease dirt and seal to give me room to install puller
This shows Lower grease seal removed and a tape measure to show the gap.
Note: the inner grey steel ring is the inner section of the bearing, and the rust colored material around the outside are the bearing rollers which are solid rust and holding it in place.
 Bearing removed, this just pulled right out with pick and some penetrating oil.
 note: you can see in the pic the race for the the bearing which is pressed into the mast.
*save old bearing, as it will be used to help press new Race into mast.
 Mast Bearing race: after some cleaning you can see the bearing race which the bearing rolls on and the upper grease seal.
 note: you can start to see that the end of mast is solid Resin, and that all these parts are press fit into the resin which is bored out to different diameters to hold each part.
 Removal of Bearing Race is the hardest part of the job.
 the process: est 2 hrs
1. use pick to clean out as much of a groove between upper section of Race and shoulder in mast.
2. soak with penetrating oil
3. I ended up grinding down the puller sections to a find point to help get behind the Race. I also made sure to pull evenly, rotating the puller 90 degrees often.
4. after the Race came half way out I used a dremal to cut Race section, which helped me to pull the race the rest of the way out of mast
 Race almost out of mast, you can see were I cut the part.
  Race removed
 bearing race removed, cleaned up and tape measure to show scale.
 Everything removed
 starting from bottom as they sit in mast:
1. Bottom grease seal
2. Bearing
3. Bearing race
4. Upper grease seal
Subscribe to:
Posts (Atom)